I. Orientation on the sides of the horizon
The sides of the horizon on the ground are determined:
1) by compass;
2) by heavenly bodies;
3) on various characteristics of local items.
First of all, each student must learn to determine the sides of the horizon using a compass, in particular, a luminous compass adapted for work at night. The student must be fluent in this simplest and basic device for orientation. It is not necessary to have a universal Adrianov compass, you can work well with an ordinary luminous compass. When training, it is necessary to achieve an unmistakable determination of both the main directions of the sides of the horizon, and intermediate and reverse directions. The ability to identify reverse directions is very important, and special attention should be paid to it during training.
The observer must remember well the direction to the north on the ground, in order to be able to indicate the sides of the horizon without a compass from any point of standing, for memory.
On the sides of the horizon, however, it is not always possible to accurately determine the direction of movement.
Usually it is taken to a certain extent approximately, for example, in relation to the points of the north, north-east, north-north-east, etc., and it does not always coincide with them. More precisely, a direction can be taken if the movement is in azimuth. Therefore, it is absolutely necessary to acquaint the student with the elementary concepts of azimuth. At first, it is necessary to ensure that he is able to: 1) determine the azimuth to a local object and 2) move along a given azimuth. As for the preparation of data for movement in azimuth, this can be done when the student learns to read the map.
How important it is to be able to move in azimuth can be seen from the following example. A certain rifle division was fighting a night battle in one of the forests in the Bryansk direction. The commander decided to surround the enemy troops. The success of the task to a large extent depended on the exact following in the given directions. Everyone, from the squad leader and above, had to follow the azimuth. And the ability to move according to the compass played a role here. As a result of a skillfully carried out night maneuver, an entire enemy division was routed.
In the absence of a compass, you can navigate by heavenly bodies: during the day - by the Sun, at night - by the Pole Star, the Moon and various constellations. And even if you have a compass, you should know the simplest methods of orientation by heavenly bodies; at night they are easy to navigate and maintain the route.
There are a number of ways to determine the sides of the horizon by the sun: by its position at noon, by sunrise or sunset, by the sun and shadow, by the sun and clock, etc. You can find them in any manual on military topography. These methods are described in sufficient detail by VI Pryanishnikov in an interesting brochure "How to navigate"; They are also found in the well-known book by Ya. I. Perelman "Entertaining astronomy". However, not all of these methods are applicable in combat practice, since their implementation requires a lot of time, calculated not in minutes, but in hours.
The fastest is the method of determination by the Sun and the clock; everyone needs to know this method. At noon, at 1 pm, the Sun is almost strictly in the south; at about 7 am it will be in the east, and at 7 pm in the west. To find the north-south line at other hours of the day, you need to introduce an appropriate correction based on the calculation that for each hour the apparent path of the Sun in the sky will be approximately 15 °. The visible disks of the Sun and the Full Moon are about half a degree across.
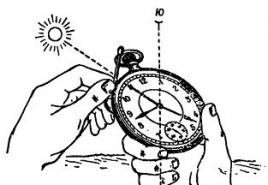
If we consider that the hour hand goes around the dial twice per day, and the Sun makes its apparent path around the Earth only once during the same time, then it is even easier to determine the sides of the horizon. For this you need:
1) position pocket or wrist watches horizontally (Fig. 1);
Figure: one. Orientation by the sun and clock
3) divide the angle formed by the hour hand, the center of the dial and the number "1" in half.
The equal dividing line will determine the north-south direction, and the south will be on the sunny side until 19 o'clock, and after 19 o'clock - where the sun was moving from.
It should be borne in mind that this method does not give an accurate result, but for orientation purposes it is quite acceptable. The main reason for the inaccuracy is that the watch dial is parallel to the horizon plane, while the Sun's apparent daily path lies in the horizontal plane only at the pole.
Since at other latitudes the apparent path of the Sun makes different angles with the horizon (up to a straight line - at the equator), then, therefore, a greater or lesser error in orientation is inevitable, reaching tens of degrees in summer, especially in southern regions. Therefore, in southern latitudes, where the sun is high in summer, it makes no sense to resort to this method. The smallest error occurs when using this method in winter, as well as during the equinox periods (around March 21 and September 23).
A more accurate result can be obtained using the following technique:
1) the watch is given not a horizontal, but an inclined position at an angle of 40-50 ° to the horizon (for latitude 50-40 °), while the watch is held with the thumb and forefinger at the numbers “4” and “10”, the number “1” from yourself (fig. 2);
2) having found on the dial the middle of the arc between the end of the hour hand and the number "1", apply here a match perpendicular to the dial;
3) without changing the position of the clock, turn with it in relation to the Sun so that the shadow from the match passes through the center of the dial; at this point the number "1" will indicate the direction to the south.

Figure: 2. Refined way of orientation by the sun and clock
We do not touch upon the theoretical substantiation of the inaccuracies made in orientation by the Sun and the clock. The question will be clear if we turn to an elementary textbook on astronomy or to a special manual on spherical astronomy. An explanation can be found in the aforementioned book by Ya. I. Perelman.
It is useful to remember that in mid-latitudes the Sun rises in the northeast in summer and sets in the northwest; in winter the Sun rises in the southeast and sets in the southwest. Only twice a year does the Sun rise exactly in the east, and sets in the west (at the equinox).
A very simple and reliable way of orienting yourself along the North Star, which always shows the direction to the north. The error here does not exceed 1–2 °. The North Star is located near the so-called pole of the world, that is, a singular point around which the entire starry sky seems to be rotating. In order to determine the true meridian, this star has been used since ancient times. It is found in the sky using the well-known constellation Ursa Major (Fig. 3).

Fig 3. Finding the North Star
The distance between the extreme stars of the "bucket" is mentally laid aside in a straight line about five times and the Polar Star is found here: in terms of brightness it is the same as the stars that make up the Big Dipper. Polaris is the end of the Ursa Minor's "bucket handle"; the stars of the latter are less bright and poorly distinguishable. It is easy to figure out that if the North Star is covered by clouds, and only the Big Dipper is visible, then the direction to the north can still be determined.
The North Star renders an invaluable service to the troops, as it allows not only to determine the sides of the horizon, but also helps to accurately maintain the route, serving as a kind of beacon.
However, the situation may be such that, due to cloudiness, neither the Big Dipper nor the North Star is visible, but the Moon is visible. The moon can also be used to determine the sides of the horizon at night, although this is a less convenient and accurate method than determining from the North Star. The fastest is the method of determination by the moon and clock. First of all, it is necessary to remember that the full (round) Moon is opposed to the Sun, that is, it is opposite the Sun. Hence it follows that at midnight, that is, at 1 o'clock in our time, she is in the south, at 7 o'clock in the west, and at 19 o'clock in the east; in comparison with the Sun, there is thus a difference of 12 hours. This difference is not expressed on the watch dial - the hour hand at 1 o'clock or at 13 o'clock will be at the same place on the dial. Therefore, the approximate sides of the horizon by the full moon and clock can be determined in the same order as by the sun and clock.
By the incomplete Moon and the clock, the sides of the horizon are identified in a slightly different way. The order of work is as follows:
1) note the observation time on the watch;
2) divide by eye the diameter of the moon into twelve equal parts (for convenience, first divide in half, then the desired half into two more parts, each of which is divided into three parts);
3) estimate how many such parts are contained in the diameter of the visible crescent moon;
4) if the Moon arrives (the right half of the lunar disk is visible), then the resulting number must be subtracted from the observation hour; if it decreases (the left side of the disk is visible), then add. In order not to forget in which case to take the sum and in what difference, it is useful to remember the following rule: take the sum when the visible crescent moon is C-shaped; in the opposite (P-shaped) position of the visible lunar crescent, the difference should be taken (Fig. 4).

Figure: 4. Mnemonic rules for introducing amendments
The sum or difference will show the hour when the Sun will be in the direction of the Moon. From here, directing to the crescent moon the place on the dial (but not the hour hand!), Which corresponds to the newly obtained hour, and taking the moon for the sun, it is easy to find the north-south line.
Example. Observation time 5 hours 30 minutes. the visible "crescent" of the Moon contains 10/12 parts of its diameter (Fig. 5).
The moon is waning, since its left C-shaped side is visible. Summing up the observation time and the number of parts of the visible "crescent" of the Moon (5 hours 30 minutes + 10). we get the time when the Sun will be in the direction of the Moon we are observing (15 hours 30 minutes) Set the division of the dial corresponding to 3 hours. 30 min., Towards the moon.
The dividing line between it by division, the center of the clock and the number "1". will give the direction of the north-south line.

Figure: 5. Orientation by incomplete moon and clock
It is pertinent to note that the accuracy in determining the sides of the horizon by the Moon and the clock is also very relative. Nevertheless, the field observer will be satisfied with this accuracy. Astronomy guides can help you figure out the margin of error.
You can also navigate by constellations, which seem to form various figures in the sky. To ancient astronomers, these figures resembled the shapes of animals and various objects, which is why they gave the constellations such names as Bear, Leo, Cygnus, Eagle, Dolphin, Lyra, Crown, etc. Some constellations got their name in honor of mythical heroes and gods, for example, Hercules, Cassiopeia, etc. There are 88 constellations in the sky.
To orientate by constellations, first of all, you need to know well the starry sky, the location of the constellations, as well as when and in what part of the sky they are visible. We have already met two of the constellations. These are the constellations Ursa Major and Ursa Minor, by which the North Star is determined. But the North Star is not the only one suitable for orientation; other stars can be used for this purpose.
Ursa Major in our latitudes is located in the northern half of the sky. In the same half of the sky, we can see the constellations Cassiopeia (outwardly resembles the letter M or W), Auriga (with the bright star Capella) and Lyra (with the bright star Vega), which are located more or less symmetrically around the North Star (Fig. 6). The intersection of straight mutually perpendicular lines drawn mentally through the constellations Cassiopeia - Ursa Major and Lyra - Charioteer gives the approximate position of the North Star. If the Big Dipper is located above the horizon with a "bucket" perpendicular to the Polar Star, as shown in Fig. 6, the "bucket" will indicate the direction to the north; Cassiopeia at this time will be high above your head. The charioteer goes to the right, to the east, and Lyra to the left, to the west. Therefore, it is possible to navigate the terrain even by one of the indicated constellations, if other of them are covered by clouds or are not visible due to any other circumstances.

Figure: 6. Constellations in the northern half of the sky
However, after 6 hours, due to the diurnal rotation of the Earth, the position of the constellations will be different: Lyra will approach the horizon, the Big Dipper will move to the right, to the east, Cassiopeia - to the left, to the west, and the Charioteer will be overhead.
Let us now turn to the southern half of the sky.
Here we will see such constellations as Orion, Taurus, Gemini, Leo, Cygnus. Due to the daily rotation of the Earth, the position of these constellations will change. Some of them will go over the horizon during the night, while others will appear over the horizon from the east. Due to the annual movement of the Earth around the Sun, the position of the constellations will be different on different days, i.e., it will change throughout the year. Therefore, constellations located in the sky far from the pole of the world are visible at one time of the year and not visible at another.
In the sky, the constellation Orion stands out perfectly in the sky. It looks like a large quadrangle, in the middle of which there are three stars in one row (Fig. 7). The top left star of Orion is called Betelgeuse. In December, around midnight, Orion points almost exactly south. In January, it is located above the south point at about 10 pm.
In fig. 7 shows the location of other constellations in the southern half of the winter sky: this is the constellation Taurus with the bright star Aldebaran, Canis Major with the brightest star in our sky - Sirius, Canis Minor with the bright star Procyon, Gemini with two bright stars - Castor and Pollux.
Gemini is located above the point south in December around midnight, Lesser Dogs in January.

Figure: 7. Constellations in the southern half of the sky (in winter)
In spring, the constellation Leo appears in the southern part of the sky with the bright star Regulus. This constellation looks like a trapezoid. It can be found on the continuation of a straight line passing from the North Star over the edge of the Big Dipper "bucket" (Fig. 8). The constellation Leo occurs above the south point in March around midnight. In May, at about midnight, the constellation Bootes with the bright star Arcturus is located above the south point (Fig. 8).

Figure: 8. Constellations about the southern half of the sky (in spring)
In summer, the constellation Cygnus with the bright star Deneb can be easily spotted in the southern sky. This constellation is located near the constellation Lyra and looks like a flying bird (Fig. 9). Below it can be found the constellation Eagle with the bright star Altair. The constellations Cygnus and Eagle are in the south around midnight during July and August. Through the constellations Eagle, Cygnus, Cassiopeia, Charioteer, Gemini, there is a faint strip of stars known as the Milky Way.
In autumn, the southern part of the sky is occupied by the constellations Andromeda and Pegasus. Andromeda's stars are drawn in one line. The bright star Andromeda (Alpherap) forms a large square with the three stars of Pegasus (Fig. 9). Pegasus is located above the point south in September around midnight.
In November, the constellation Taurus, shown in Fig. 7.
It is useful to remember that during the course of the year all the stars are gradually shifting towards the west and, consequently, some constellation in a month will be located above the point of the south not at midnight, but somewhat earlier. In half a month, the same constellation will appear above the south point an hour earlier than midnight, in a month - two hours earlier, in two months - four hours earlier, etc. In the previous month, the same constellation appeared above the south point and two hours later than midnight, two months ago - four hours later than patunochi, etc. For example, the extreme stars of the Big Dipper "bucket" (which determine the position of the North Star - see Fig. 3) are directed vertically downward from the North Star on an autumn day equinox at about 23 hours. The same position of the Big Dipper is observed a month later, at the end of October, but already at about 21:00, at the end of November - at about 19:00, etc. During the winter solstice (December 22), the "bucket" of the Big Dipper at midnight takes a horizontal position, to the right of the North Star. By the end of March, at the vernal equinox, the "ladle" at midnight takes an almost vertical position and is visible high overhead, up from the North Star. By the time of the summer solstice (June 22), the "bucket" at midnight is again located almost horizontally, but to the left of the Pole Star.

Figure: nine. Constellations in the southern half of the sky (summer to autumn)
It is necessary to use every suitable opportunity to teach trainees to quickly and accurately find the main constellations in the sky at different times of the night and year. The leader must not only explain the methods for determining the sides of the horizon by the heavenly bodies, but must also show them in practice. It is very important that the trainees themselves practically determine the sides of the horizon according to the described methods, only then can one expect success in learning.
It is better to demonstrate different options for determining the sides of the horizon by celestial bodies at the same place, at different positions of the stars, so that the learners can personally see the same results.
By the way, we note that with the help of a compass and celestial bodies (Sun, Moon), it is possible to solve the inverse problem - to determine the approximate time. For this you need:
1) take the azimuth of the Sun;
2) divide the azimuth by 15;
3) add 1 to the result.
The resulting number will indicate the approximate time. In principle, the error allowed here will be the same as for orientation by the sun and clock (see pages 9 and 10).
Examples. 1) The azimuth to the Sun is 195 °. Deciding: 195: 15-13; 13 + 1 \u003d 14 hours.
2) The azimuth to the Sun is 66 °. We solve: 66: 15-4.4; 4.4 + 1 \u003d about 5 1/2 hours.
Time, however, can be determined by heavenly bodies and without a compass. We will give some approximate methods, since the definition of time is important when orienting on the ground.
During the day, you can practice determining the time from the Sun, if you remember that the highest position of the Sun is at 13 o'clock (at noon). Noticing many times the position of the Sun at different hours of the day in a given area, in the end, you can develop the skills to determine the time with an accuracy of half an hour. In everyday life, the approximate time is often determined by the height of the Sun above the horizon.
At night, you can find out the time by the position of the Big Dipper. To do this, you need to outline a line in the sky - an hour hand, passing from the Polar Star to the two extreme stars of the Big Dipper's “bucket”, and mentally imagine in this part of the sky a clock dial, the center of which will be the North Star (Fig. 10). The time is determined further as follows:
1) count down the time according to the heavenly "hand" (in Fig. 10 it will be 7 hours);
2) take the ordinal number of the month from the beginning of the year with tenths, counting every 3 days for one tenth of the month (for example, October 15th will correspond to the number 10.5);

Figure: ten. Heavenly clock
3) add the first two found numbers together and multiply the sum by two [in our case it will be (7 + 10.5) x 2 \u003d 35];
4) subtract the resulting number from the coefficient equal to 55.3 for the "arrow" of the Big Dipper (55.3-35 \u003d 20.3). The result will give the time at the moment (20 hours 20 minutes). If the total was more than 24, then 24 must be subtracted from it.
The coefficient 55.3 is deduced from a certain location of the Big Dipper among other stars in the sky.
Arrows can also be stars of other constellations close to the North Star, but the coefficients in such cases will be different numbers. For example, for the “arrow” between the Polar Star and the brightest star after it, Ursa Minor (the lower outer corner of the “bucket”), the coefficient is 59.1. For the "arrow" between the North Star and the middle, brightest, star of the constellation Cassiopeia, the coefficient is 67.2. To get a more reliable result, it is advisable to determine the time for all three "arrows" and take the average of three readings.
Methods for determining the sides of the horizon by compass and celestial bodies are the best and most reliable. Determining the sides of the horizon from various features of local objects, although less reliable, nevertheless, in a certain setting, can be useful. In order to use the various features of objects with the greatest success, you need to study the surrounding area and more often look closely at the everyday phenomena of nature. In this way, observation develops in trainees.
In the diaries of travelers, in fiction and scientific literature, in periodicals, in the stories of hunters and pathfinders, there is always valuable material related to orientation.
The ability to extract from one's own observations and the observations of others all that may be useful for the combat training of the student is one of the tasks of the teacher.
The ability to navigate by barely noticeable signs is especially developed among northern peoples. “Over the centuries, northern peoples have developed their own view of distances. To visit a neighbor located at a distance of two hundred or three hundred kilometers is not considered a trip.
And the off-road does not matter. In winter, the road is everywhere. Of course, you need to be able to navigate among a very monochromatic landscape, and sometimes in a blizzard, which makes it impossible to distinguish anything except swirling snow. Under such conditions, any newcomer would risk his life. Only a native of the North will not go astray, guided by some almost indistinguishable signs. "
It is necessary to use special signs carefully and skillfully. Some of them give reliable results only under certain conditions of time and place. Suitable in some conditions, they may not be suitable in others. Sometimes the problem is solved only by simultaneous observation of several features.
The vast majority of features are associated with the position of objects in relation to the Sun. The difference in illumination and heating by the sun usually causes certain changes on the sunny or shadow side of the object. However, a number of attendant factors can sometimes violate the expected pattern, and then even well-known features will turn out to be unsuitable for orientation purposes.
It is widely believed that you can navigate by the branches of trees. It is generally believed that tree branches are more developed in a southerly direction. Meanwhile, the observation experience says that it is impossible to navigate by this sign in the forest, since the branches of trees develop more not towards the south, but towards free space.
They say that you can navigate by free-standing trees, but here too often mistakes are possible. First, one cannot be sure that the tree grew separately all the time.
Secondly, the formation and general configuration of the crown of a free-standing tree is sometimes much more dependent on the prevailing winds (see below, p. 42). rather than from the sun, not to mention other reasons that affect the growth and development of the tree. This relationship is especially visible in the mountains, where the winds are very strong.
Also well known is the method of orientation by the growth rings of wood. It is believed that these rings on the stumps of cut trees standing in an open area are wider in the south than in the north. I must say, no matter how much we observed, we could not find this pattern. Turning to the specialized literature, we found the answer there. It turns out that the width of the timber track, just like the development of branches on trees, depends not only on the intensity of sunlight, but also on the strength and direction of the winds. Moreover, the width of the rings is uneven not only horizontally, but also vertically; consequently, the pattern of tree rings may change if the tree is cut at different heights from the ground.
We deliberately stopped at these features, since they are the most popular.
Meanwhile, the facts are convincing that they should be considered unreliable.
It is not difficult to be convinced of this, one has only to observe more.
In the temperate zone, the sides of the horizon can be easily identified by the bark and lichens (moss) on the trees; you just need to inspect not one, but several trees. On birches, the bark is lighter and more elastic on the south side than on the north (Fig. 11). The difference in color is so striking that you can successfully navigate the birch bark even in the middle of a sparse forest.

Figure: eleven. Birch bark orientation
Generally speaking, the bark of many trees is somewhat rougher on the north side than on the south.
The development of a lichen mainly on the northern side of the trunk makes it possible to determine the sides of the horizon using other trees. On some of them, the lichen is noticeable at first glance, on others it is visible only upon close examination. If lichen is present on different sides of the trunk, then there is usually more of it on the northern side, especially near the root. Taiga hunters navigate bark and lichens surprisingly well. However, it should be borne in mind that in winter the lichen can be covered with snow.
The experience of the war shows that the skillful use of forest signs helped to maintain a given direction and maintain the required battle formation in the forest. One unit had to go west through the forest on a rainy day; seeing the lichens on the tree trunks to the left of them, and the trunks without lichens on the right, the soldiers quite accurately withstood the direction and completed the task.
The northern slopes of the wooden roofs are more covered with green-brown moss than the southern ones. Moss and mold sometimes develop near the drainpipes located on the northern side of the buildings. Moss and lichen often cover the shady sides of large stones and rocks (Fig. 12); in mountainous areas, as well as where boulder deposits are developed, this feature is common and can be useful. However, when orienting on this basis, it should be borne in mind that the development of lichen and moss in some cases depends much more on the prevailing winds bringing rain than on the location in relation to the sun.

Figure: 12. Moss orientation on stone
Pine trunks are usually covered with a crust (secondary), which forms earlier on the northern side of the trunk, and therefore extends higher than on the southern side. This is especially clearly seen after rains, when the crust swells and turns black (Fig. 13). In addition, in hot weather, resin appears on the trunks of pines and spruces, accumulating more on the southern side of the trunks.

Figure: 13. Orientation by pine crust
Ants usually (but not always) make their homes south of nearby trees, stumps, and bushes. The southern side of the anthill is more sloping, and the northern one is steeper (Fig. 14).

Figure: 14. Anthill orientation
In northern latitudes, on summer nights, due to the proximity of the setting sun to the horizon, the northern side of the sky is the lightest, the southern one the darkest. This feature is sometimes used by pilots when operating at night.
On a polar night in the Arctic, the picture is the opposite: the lightest part of the sky is the southern one, the northern one is the darkest.
In spring, on the northern outskirts of meadows in the forest, the grass grows thicker than on the southern ones; to the south of the stumps of trunks, large stones, and pillars, the grass is thicker and higher than to the north (Fig. 15).

Figure: 15. Orientation on the grass near the stump
In summer, during prolonged hot weather, the grass south of these objects sometimes turns yellow and even dries up, while to the north it remains green.
Berries and fruits in the ripening period acquire color earlier on the south side.
The sunflower and the string are curious, the flowers of which are usually turned towards the sun and turn following its movement across the sky. On rainy days, this circumstance gives the observer some opportunity for a rough orientation, since the flowers of these plants are not directed to the north.
In summer, the soil near large stones, individual buildings, stumps is drier on the south side than on the north; this difference is easy to notice by touch.
The letter "N" (sometimes "C") at the weather vane indicates north (Fig. 16).

Fig 10. Vane. The letter N indicates north
Altars of Orthodox churches and chapels are facing east, bell towers - “from the west; the raised edge of the lower crossbeam of the cross on the dome of the church points to the north, and the lowered edge points to the south (Fig. 17). Altars of Lutheran churches (kirok) are also facing east, and bell towers - to the west. The altars of the Catholic Ostels are facing west.
It can be assumed that the doors of Muslim mosques and Jewish synagogues in the European part of the Soviet Union face approximately to the north. The idols are facing south. According to the observations of travelers, exits from the yurts are made to the south.

Fig 17. Orientation along the cross on the dome of the church
It is interesting to note that conscious orientation took place during the construction of dwellings, even in the days of pile construction. Among the Egyptians, orientation during the construction of temples was conditioned by strict legal provisions; the lateral faces of the ancient Egyptian pyramids are located in the direction of the sides of the horizon.
Glades in large forest farms (in forest dachas) are often cut almost strictly along the north-south and east-west lines.
On some topographic maps this is very clear. The forest is divided by glades into quarters, which in the USSR are usually numbered from west to east and from north to south, so that the first number is in the northwest corner of the farm, and the last number is in the extreme southeast (Fig. 18).

Figure: eighteen. The order of numbering of forest quarters
Quarter numbers are marked on the so-called quarter pillars, placed at all intersections of glades. To do this, the upper part of each pillar is trimmed in the form of edges, on which the number of the opposite quarter is burned out or painted with paint. It is easy to figure out that the edge between the two adjacent faces with the smallest numbers in this case will indicate the direction to the north (Fig. 19).

Fig 19. Quarter pillar orientation
This sign can be guided in many other European countries, for example, in Germany, Poland. It is not superfluous, however, to know that in Germany and Poland the forest management leads the numbering of quarters in the reverse order, that is, from east to west. But this will not change the method of determining the north point. In some countries, block numbers are often indicated by inscriptions on stones, on plaques attached to trees, and finally also on poles.
It should be remembered that for economic reasons, glades can be cut in other directions (for example, parallel to the direction of the highway or depending on the relief). In small forest tracts and in the mountains, this is most often the case. Nevertheless, in this case, for a rough orientation, the indicated sign can sometimes turn out to be useful. During military operations in the forest, the figures on the quarter pillars are interesting in another respect: they can be used for target designation. For determining the sides of the horizon, clearing is also suitable, which is usually carried out against the direction of the prevailing wind. You can learn more about all this in the courses on forest management and forestry.
The presence of snow creates additional signs for orientation. In winter, snow sticks to buildings more on the north side and thaws faster on the south. Snow in a ravine, ravine, hole on the north side melts earlier than on the south; the corresponding thawing can be observed even on the footprints of humans or animals. In the mountains, snow melts faster on the southern slopes. On hillocks and hillocks, melting occurs more intensely also from the southern side (Fig. 20).

Figure: twenty. Orientation by melting snow in depressions and on elevations
On slopes facing south, in the spring, glades appear the faster, the steeper these slopes: each extra degree of slope of the terrain to the south is, as it were, equivalent to approaching the terrain by one degree to the equator. The roots of trees and stumps are cleared of snow earlier on the south side. On the shady (northern) side of objects, snow lasts longer in spring. At the beginning of spring, on the southern side of buildings, hillocks, stones, the snow already has time to thaw a little and move away, while on the northern side it adheres tightly to these objects (Fig. 21).

Figure: 21. Orientation by melting snow on stone
At the northern edge of the forest, the soil is freed from the snow sometimes 10-15 days later than at the southern edge.
In March-April, in conjunction with the melting of snow, you can navigate along the holes elongated to the south (Fig. 22), which are surrounded by tree trunks, stumps and pillars standing in an open place; on the shaded (northern) side of the holes is not native and a ridge of snow is visible. Wells are formed from solar heat reflected and diffused by the specified objects.

Figure: 22. Hole orientation
It is also possible to determine the sides of the horizon by the holes in the fall, if the snow that fell melted from the sun's rays. These holes should not be confused with "concentric depressions" blown out in blizzards, such as around posts or stumps.
In spring, on the slopes facing the sun, the snow mass "bristles", as it were, forming peculiar protrusions ("thorns"), separated by depressions (рнс. 23). The ledges are parallel to each other, tilted at the same angle to the ground, and point towards noon. The angle of inclination of the protrusions corresponds to the angle of the sun at its highest point. These ridges and depressions are especially visible on slopes covered with polluted snow. Sometimes they also appear on horizontal or slightly inclined areas of the earth's surface. It is easy to guess that they are formed under the influence of the heat of the midday rays of the sun.

Figure: 23. Orientation by snow "thorns" and depressions on the slope
Observing slopes differently in relation to the sun's rays can also help you navigate the terrain. In the spring, vegetation develops earlier and faster on the southern slopes, and later and more slowly on the northern slopes. Under normal conditions, the southern slopes are generally drier, less soddy, and the processes of washout and erosion are more pronounced on them. However, this is not always the case. The correct solution to the issue often requires taking into account many factors.
It is noted that in many mountainous regions of Siberia, the slopes facing south are more gentle, since they are freed from snow earlier, dry up earlier and are more easily destroyed by rain and snow melt waters flowing down them. The northern slopes, on the contrary, stay under snow for longer, are better wetted and less destroyed, so they are steeper. This phenomenon is so typical here that in some areas it is possible on a rainy day by the shape of the slopes to accurately determine the cardinal points.
In desert areas, moisture falling on the southern slopes quickly evaporates, therefore, on these slopes, the wind produces waving of debris. On the northern slopes, protected from the direct influence of the sun, the waving is less pronounced; here mainly physical and chemical processes take place, accompanied by the transformation of the composition of rocks and minerals. This character of the slopes is observed at the borders of the Gobi Desert, in the Sahara, on many ridges of the Tien Shan system.
Determining the sides of the horizon directly downwind is possible only in areas where its direction is constant for a long time. In this sense, trade winds, monsoons and breezes have served people more than once. In Antarctica, on the land of Adelie, the south-southeast wind blows so constantly that members of the Mausson expedition (1911–1914) in a blizzard and in complete darkness were guided unmistakably by the wind; during excursions into the interior of the mainland, travelers preferred to orient themselves by the wind, rather than by the compass, the accuracy of which was greatly influenced by the proximity of the magnetic pole.
It is more convenient to navigate by the results of the wind action on the terrain; for this you only need to know the direction of the prevailing wind in a given area.
Wind traces are especially visible in the mountains, but in winter they are clearly visible on the plain.
The direction of the prevailing wind can be judged by the slope of the trunks of most trees, especially on the edges and separate trees, in which the slope is more noticeable; in the steppes of Bessarabia, for example, the trees are inclined to the southeast. All the olive trees in Palestine are leaning to the southeast. Under the influence of the prevailing winds, a flag-like shape of trees is sometimes formed due to the fact that on the windward side of the trees the buds dry out and the branches do not develop. Such "natural weather vane", as Charles Darwin called them, can be seen on the Cape Verde Islands, in Normandy, Palestine and other places. It is curious to note that on the Cape Verde islands there are trees in which the top, under the influence of the trade wind, is bent at right angles to the trunk. Windfalls are also oriented; in the Subpolar Urals, for example, because of strong northwestern winds, they tend to be directed to the southeast. The sides of wooden structures, poles, fences exposed to the influence of the prevailing wind break down faster and differ in color from the other sides. In places where the wind blows in one specific direction for most of the year, its grinding activity is very dramatic. In weathered rocks (clays, limestones), parallel grooves are formed, elongated in the direction of the prevailing wind and separated by sharp ridges. On the surface of the limestone plateau of the Libyan Desert, such sand-cut furrows reach a depth of 1 m and are extended in the direction of the prevailing north-south wind. Niches are often formed in the same way in soft rocks, over which the harder layers hang in the form of cornices (Fig. 24).

Figure: 24. Orientation by the degree of weathering of rocks (the arrow indicates the direction of the prevailing wind)
In the mountains of Central Asia, the Caucasus, the Urals, the Carpathians, the Alps and in the deserts, the destructive work of the wind is very well expressed. Extensive material on this subject can be found in courses in geology.
In western Europe (France, Germany), winds that bring bad weather affect most of all on the north-western side of the objects.
The effect of wind on mountain slopes affects differently depending on the position of the slopes in relation to the prevailing wind.
In the mountains, steppe and tundra, the prevailing winter winds, moving snow (blizzards, blizzard), have a great influence on the terrain. The windward slopes of the mountains are usually slightly covered with snow or completely snowless, the plants on them are damaged, the soil freezes deep and deeply. On the leeward slopes, on the contrary, snow accumulates.
When the terrain is covered with snow, you can find other indications for orientation created by the work of the wind. Particularly suitable for this purpose are some surface snow formations that arise in various conditions of relief and vegetation. At the cliffs and ditches, on the walls facing away from the wind, a beak-shaped snow peak is formed from above, sometimes curving downward (Fig. 25).

Figure: 25. Snow accumulation scheme at cliffs and ditches (arrows indicate the movement of wind jets)
At the steep walls facing the wind, due to the swirling of the snow at the base, a blowing chute is formed (Fig. 26).

Figure: 26. Snow accumulation scheme at steep walls facing the wind (arrows indicate the movement of wind jets)
At small individual elevations (hill, hillock, haystack, etc.) on the leeward side, behind a small blowing chute, a flat lingual snowdrift is deposited with a steep slope facing the hill and gradually thinning in the opposite direction: on the windward side, with sufficient steepness, a blowing chute forms ... On equally sloping low ridges such as a railway embankment, snow is deposited only at the base of the ridge, and is blown away from the top (Fig. 27). However, a snowdrift forms at the top of high, evenly sloping ridges.

Figure: 27. Snow accumulation scheme at an equilateral low ridge (arrows indicate the movement of wind jets)
Regular snow accumulations can also be created near trees, stumps, bushes and other small objects. Near them, a triangular sediment is usually formed on the windward side, elongated in the direction of the wind. These wind sediments allow you to navigate through them in a rare forest or field.
As a result of the movement of snow by the wind, various surface formations are created in the form of snow accumulations transverse and longitudinal with respect to the wind. The so-called snow waves (sastrugs) and snow ripples belong to the transverse formations, to the longitudinal ones - snow dunes and linguistic accumulations. The most interesting of these are snow waves, which are a very common form of snow surface. They are common on the dense surface of the snow crust, on the ice of rivers and lakes. These snow waves are white in color, which makes them different from the underlying crust or ice. “The snow waves on the vast plains are widely used as a guide on the way. Knowing the direction of the wind that created the waves, you can use the location of the waves as a compass on the way. "
S.V. Obruchev notes that in Chukotka he had to navigate through the sastrugs during the night. In the Arctic, sastrugs are very often used as landmarks on the way.
Rime (long ice and snow filaments and brushes) is formed on tree branches mainly from the direction of the prevailing wind.
Uneven overgrowth of the Baltic lakes is characteristic as a result of the influence of the prevailing winds. The leeward, western shores of the lakes and their bays, directed to the west, are overgrown with peat and turned into peat bogs. On the contrary, the eastern, windward, wave-breaking shores are free of thickets.
Knowing the direction of the constantly blowing wind in a given area, the sides of the horizon can be determined by the shape of dunes or dunes (Fig. 28). As you know, accumulations of sand of this type are usually short ridges, generally elongated perpendicular to the direction of the prevailing wind. The convex part of the dune is directed towards the wind, while its concave part is leeward: the “horns” of the dune are stretched out towards the direction of the wind. The slopes of dunes and dunes facing the prevailing wind are gentle (up to 15 °), leeward - steep (up to 40 °).

Figure: 28. Orientation:
A - along the dunes; B - along the dunes (arrows indicate the direction of the prevailing wind)
Their windward slopes are compacted by the wind, grains of sand are tightly pressed against one another; leeward slopes - crumbling, loose. Under the influence of the wind, sandy ripples are often formed on the windward slopes in the form of parallel ridges, often branching and perpendicular to the direction of the wind; there are no ripples on the leeward slopes. Dunes and dunes can sometimes connect with each other and form dune chains, that is, parallel ridges, elongated transversely to the direction of the prevailing winds. The height of the dunes and dunes ranges from 3-5 m to 30-40 m.
There are sand accumulations in the form of ridges, elongated in the direction of the prevailing winds.
These are the so-called ridge sands; their rounded ridges are parallel to the wind; they have no division of slopes into steep and gentle ones.
The height of such longitudinal dunes can reach several tens of meters, and the length - several kilometers.
Dune formations are usually found along the shores of the seas, large lakes, rivers, in deserts. Longitudinal dunes are more widespread in deserts than transverse ones. Dunes are usually found only in deserts. Sand accumulations of various types are found in the Baltics, in the Trans-Caspian deserts, near the Aral Sea, near the lake. Balkhash and in other places.
There are numerous sandy formations in the deserts of North Africa, Central Asia, and Australia.
In our Central Asian deserts (Kara-Kum, Kyzyl-Kum), where northerly winds prevail, ridge sands stretch most often in the meridional direction, and dune chains - in the latitudinal direction. In Xinjiang (Western China), where easterly winds prevail, dune chains are stretched approximately in the meridional direction.
In the deserts of North Africa (Sahara, Libyan Desert), ridge sands are also oriented in accordance with the direction of the prevailing winds. If you mentally follow in the direction from the Mediterranean Sea inland, then at first the sand ridges are oriented approximately along the meridian, and then more and more deviate to the west and at the borders of Sudan take a latitudinal direction. Due to strong summer winds blowing from the south, along the latitudinal ridges (near the borders of Sudan), the northern slope is steep, and the southern one is gentle. Sand ridges are often traced here for hundreds of kilometers.
In the Australian deserts, sand ridges stretch out in the form of many parallel weakly winding lines, separated from one another by an average distance of about 400 m. These ridges also reach a length of several hundred kilometers. The stretch of the sandy ridges exactly matches the direction of the prevailing winds in different parts of Australia. In the southeastern deserts of Australia, the ridges are elongated meridionally, the northern ones deviate to the northwest, and in the deserts of the western part of Australia they stretch in the latitudinal direction.
In the southwestern part of the Indian Thar Desert, the dune ridges strike northeast, but in its northeastern part, the general direction of the dunes is northwest.
For orientation purposes, small sand accumulations that form near various obstacles (uneven surface, lump, stone, bush, etc.) can also be used.
Near the bushes, for example, a sand spit appears, elongated with a sharp edge in the direction of the wind. Near impenetrable barriers, sand sometimes forms small bumps and blowing troughs like snow, but the process is more complicated here and depends on the height of the barrier, the size of the grains of sand and the strength of the wind.
The natural location of sand accumulations in deserts is clearly visible from an airplane, aerial photographs, and topographic maps. Sand ridges sometimes make it easier for pilots to maintain the correct direction of flight.
In some areas, you can navigate by other signs that have a narrow local meaning. Especially many such signs can be observed among the vegetation covering slopes of various exposures.
On the northern slopes of the dunes, south of Liepaja (Libava), plants of humid places grow (moss, blueberries, lingonberries, crowberry), while on the southern slopes, dry-loving plants (lichen, heather) grow; on the southern slopes, the soil cover is thin, in places sand is exposed.
In the southern Urals, in the ash of the forest-steppe, the southern slopes of the mountains are rocky and covered with grass, while the northern ones are covered with soft sediments and overgrown with birch forests. In the south of the Buguruslan region, the southern slopes are covered with meadows, and the northern ones - with forest.
In the basin of the Upper Angara river, steppe areas are confined to the southern slopes; other slopes are covered with taiga forest. In Altai, the northern slopes are also much richer in forest.
The north-facing slopes of the river valleys between Yakutsk and the mouth of the Mai are densely covered with larch and almost devoid of grassy cover; the slopes facing south are covered with pine or typical steppe vegetation.
In the mountains of the Western Caucasus, pine grows on the southern slopes, on the northern slopes - beech, spruce, fir. In the western part of the North Caucasus, beech covers the northern slopes, and oak covers the southern ones. In the southern part of Ossetia, on the northern slopes, spruce, fir, yew, beech grow, on the southern slopes - sssna and oak. “Throughout Transcaucasia, starting from the valley of the Riopa River and ending with the valley of the Kura tributary in Azerbaijan, oak forests settle with such constancy on the southern slopes that by the spread of oak on foggy days without a compass, you can accurately determine the countries of the world.”
In the Far East, in the South Ussuri region, the velvet tree is found almost exclusively on the northern slopes, on the southern slopes the oak dominates. A coniferous forest grows on the western slopes of Snhote-Alin, and a mixed forest on the eastern slopes.
In the Kursk region, in the Lgovskiy district, oak forests grow on the southern slopes, on the northern slopes birch predominates.
The oak is thus very characteristic of the southern slopes.
In Transbaikalia, at the height of summer, on the northern slopes, permafrost was observed at a depth of 10 cm, while on the southern slopes it was at a depth of 2–3 m.
The southern slopes of the Bulgunnyakhs (rounded, domed hills up to 30–50 m high are stacked inside with ice, and are covered with frozen ground on top, found in northern Asia and North America) are usually steep, overgrown with grass or complicated by landslides, the northern ones are gentle, often forested.
The vineyards are planted on the slopes facing south.
In mountains with pronounced relief forms, forests and meadows on the southern slopes usually rise higher than on the northern slopes. In temperate and high latitudes, in the mountains covered with eternal snow, there is a snow line. It is higher on the southern slopes than on the northern slopes; however, there may be deviations from this rule.
* * *
The number of special signs by which you can navigate is not limited to the listed examples - there are many more. But the given material also clearly shows what an abundance of the simplest signs the observer has when navigating the terrain.
Some of these features are more reliable and applicable everywhere, others are less reliable and useful only in certain conditions of time and place.
One way or another, all of them must be used skillfully and thoughtfully.
Notes:
Azimuth - a word of Arabic origin ( orassumút), meaning paths, roads.
The hours by which we live were transferred by a government decree from June 16, 1930 to the USSR 1 hour ahead of the solar time; therefore, noon comes with us not at 12, but at 13 o'clock (so-called daylight saving time).
Bubnov I., Kremp A., Folimonov S.,Military Topography, ed. 4th, Military Publishing, 1953
M. Nabokov and B. Vorontsov-Velyaminov,Astronomy, a textbook for the 10th grade of high school, ed. 4th, 1940
Kazakov S., Course of Spherical Astronomy, ed. 2nd, Gostekhizdat, 1940
You can divide the radius of the moon into six equal parts, the result will be the same.
Kazakov S. Spherical Astronomy Course, ed. 2nd, 1940; Nabokov M. and Vorontsov- Velyaminov B., Astronomy, textbook for the 10th grade of high school, ed. 4 e. 1940
Shchukin I., General morphology of land, vol. II, GONTI, 1938, p. 277.
M. Tkachenko, - General forestry, Goslestekhizdat. 1939, pp. 93–94.
K. Kosnachev, Bulguniyakhi, "Nature" No. 11. 1953, p. 112.
Technological map of the lesson: Orientation (1 hour)
Geography teacher "Gymnasium No. 22 of Belgorod" Vlasova GA
Grade 5
Subject geography
Planned results
Subject
Metasubject
Personal
Know the definitions of the concepts of "orientation", "azimuth"
Plan educational activities while studying the topic;
Use adequate language means to express your thoughts, motives and needs.
To reveal the essential features of the concept "rumb"
Define concepts
Name and explain ways of orientation,
Have oral (written) speech
Name algorithms for working with a compass and gnomon;
Build a monologue statement
Be able to determine the azimuth by compass on the ground and according to the plan;
Be able to explain the content of the actions performed
Be able to navigate the terrain on the sides of the horizon
Be able to argue your point of view
Expand the role of aerial photographs in the creation of terrain plans
Form the action of goal setting
(including the transformation of a practical task into a cognitive one)
Be able to plan ways to achieve a goal
Independently assess the correct performance of the action and make the necessary adjustments
Manage your time on your own
Create and transform circuits to solve problems
Carry out cognitive reflection in relation to actions to solve educational and cognitive tasks
Independently set new learning objectives and goals
Carry out self-regulation in educational and cognitive activities
Diagnostic tools:
Notebook. "My simulator" (tasks 1-4, from 16; 20, 21, from 20-21;
Task number 7 on page 32;
Resource support of the program:
§8 of the tutorial
Table "Plan and map"
Table "Ability to navigate the terrain"
Student compasses
Teacher activity
Student activities
Cognitive
Communicative
Regulatory
Actions taken
Actions taken
Formable ways of activity
Actions taken
Formable ways of activity
Stage "Checking the keeping of observation diaries"
1.Checks the keeping of weather diaries.
Provides information about the weather for the past days.
Ability to properly organize the observation of the weather.
Interact with the teacher, classmates while reporting weather information.
Stage "Checking homework"
1. Repeats
regulations work with control and measuring materials in geography.
Organizes work on control and measuring materials for geography (tests) (3 min.).
Geographic dictation
Of 7 tasks 3 min
Tests are solved. 5 tasks
Ability to fill out the answers correctly.
They interact with the teacher, classmates while repeating the rules of working with CMMs.
Listen to the teacher.
Control the correctness of students' answers
Be able to listen to the teacher.
Stage "Setting the goal and objectives of the lesson"
1.Works with the headings before the paragraph - the teacher asks questions.
We'll start with the most pleasant. Now I am going to read you an excerpt from one of the very famous Russian folk tales.
If you go to the left, you will lose your horse. If you go to the right, you will lose yourself; if you go straight, you will be rich.
Did you recognize the fairy tale? And you and I can also navigate the city - right, left, straight ...
Remember
1.How does one navigate unfamiliar terrain?
2. What local signs allow a person to navigate the terrain?
You will learn
1. What is orientation.
2. what are the sides of the horizon and what they are.
3. Why you need a compass and how to work with it.
3. Summarizes the work on the rubrics.
4. Try to name the topic of the lesson yourself.
The teacher, if necessary, clarifies:“Orientation on the ground. Azimuth".
This is the topic of our tutorial. Let's open our notebooks and write down the topic of the lesson.
Objective of today's lesson
Learn to determine the sides of the horizon and directions on the plan and map.
Answer the teacher's questions. Make assumptions
about the topic of the lesson
Selects essential information from the answers to the questions.
They interact with the teacher during the questioning, carried out in the frontal mode.
Listen to the interlocutor. Build answers that are understandable to the interlocutor.
Control the correctness of students' answers.
Be able to listen in accordance with the target. Accept and maintain the learning goal and goal. Supplement, clarify the opinions expressed on the merits of the task received.
Stage "Work on the study of new material"
Cognitive
Communicative
Regulatory
Actions taken
Formable ways of activity
Actions taken
Formable ways of activity
Actions taken
Formable ways of activity
1. Organizes work on the study of a new topic.
What do you think (problematic question)
Can I navigate without a compass?
Explanation
2. Organizes work to highlight the main idea of \u200b\u200bthe topic :
the formation of ideas about orientation on the ground, the ability to use measuring instruments.
2. Suggests: let's remember and write in a notebook:
orientation, main sides of the horizon, intermediate sides of the horizon, bearing, cardinal points, compass
3. Organization of practical work -
on the formation of skills to use a compass:
Study the rules for using a compass;
Working with a compass in pairs;
Solving tasks to determine the sides of the horizon in the classroom;
Designation on the drawn up office plan
objects located on the sides of the horizon
Students listen
with the aim of:
Their understanding of the content of the main idea of \u200b\u200bthe new topic of ideas about orientation on the ground
Students pronounce new terms aloud and write them down in a notebook: orientation, main sides of the horizon, intermediate sides of the horizon, bearing, cardinal points, compass
Students become familiar with the compass algorithm
Solve tasks to determine the sides of the horizon in the classroom.
The results of the work are drawn up in the form of a table.
Objects are applied to the office plan according to the sides of the horizon.
Analyze the content of the new material highlighting the main idea: about orientation on the ground
Deliberately and arbitrarily build a speech utterance in oral form to master the algorithm for the ability to use
Compass.
Consciously do the work of filling out the table.
Consciously carry out work on drawing objects on the office plan
The whole class listens to the teacher's explanation.
All students are ready to answer questions.
Participate in the study and mastery of the algorithm, help the teacher.
Ability to follow the teacher's explanation, to understand the content of new material by ear.
Ability to fill out a table based on observations
Understand learners' answers by ear. Be able to formulate your own opinion and position. Be able to use speech to regulate your actions.
Be able to work with a table.
Be able to work with an office plan.
Students identify new terms as they explain.
In the course of work, students control the correctness and completeness of the recording of new terms.
Records are corrected and specified as necessary.
In the course of filling out the table, students carry out self-control of understanding the contents of the table.
Self-control over actions.
Students choose the best work.
They make notes in a notebook of new terms: orientation, main sides of the horizon, intermediate sides of the horizon, bearing, cardinal points, compass.
Understand and maintain the learning goal and purpose. Detect inaccuracies in responses.
Exercise mutual control.
Accept the teacher's assessment adequately.
Understand and maintain the learning goal and purpose. Exercise self-control.
Evaluate the work.
Stage "Work to consolidate new material"
1. Sets a goal to test knowledge of new material (questions p. 32)
What is orienteering?
What are the main sides of the horizon called?
What is the name of the device for determining the sides of the horizon?
Are there territories on Earth where it is impossible to accurately determine the sides with a compass?
Why did it become necessary to introduce intermediate horizon sides?
Answer the teacher's questions.
Make a generalized conclusion in the process of answering questions.
Analysis of the text is carried out, highlighting essential and insignificant semantic features.
The class makes an effort to solve the learning problem.
To coordinate efforts to solve a learning problem. Consider other opinions.
Exercise mutual control of the task execution process.
Accept and save the learning task. Detect inaccuracies in responses.
Teacher activity
Determination of directions on the plan and map (work with a plan of the area)
Show directions on the ground plan.
How is it usually shown?
In which direction from the ferry on the Sot river is the dam on the Luch river?
Determine how the direction of the Sot river changes.
Problem - C or C-B?
Each side of the horizon has not only its own name, but also a digital meaning- azimuth ... What is azimuth?
Open the textbooks and read the definition of azimuth.
So what is AZIMUTH?
ANGLE is the basis for working with this concept, that is, to determine the azimuth, you need to determine the angle.
Now let's designate them in your first drawing.
90 o, 180 o, 270 o, 360 o
How should you navigate the terrain?
And at night?
By the stars.
anchorage
Teacher activity
Let's now play and practice defining the sides of the horizon.
Pilots. From the Rostov airport there are flights Belgorod - Sochi, Belgorod - Moscow, Belgorod - London, Belgorod - Rio de Janeiro,
What course should pilots take to stay on course?
Students write down the object and the horizon side of the flight direction
Write down the homework.
Stage "Reflection". Answer the question: did you like the lesson or not? On the interactive whiteboard, emoticons are inserted that match the answer.
Grading Phase: The teacher grades and comments on them.
As a fan of adventure literature about pirates, it was even very interesting for me to answer this question. Most of the novels on this topic, especially about the search for treasures, were supplied by the authors with fictitious maps, where they necessarily drew a "wind rose" to determine the cardinal points. However, there could be up to 16 arrows in this rose.
Intermediate sides of the horizon
The easiest way to consider this issue is by the example of the "wind rose", i.e. The chart used to define the sides of the North-South-West-East horizon is a vertical cross with an angle of 90 degrees. Intermediate sides (for example, northeast) are rays that divide the main diagram exactly in half, and thus the difference in degrees of the angle becomes equal to 45. The "wind rose" itself exists in the following variations:
- Eight-ray - is used in the basics of geography, and each of its rays includes not only the cardinal direction (south and west), but also an intermediate course (southwest) between them.
- 16-ray - in addition to the sides of the horizon, as on a compass rose, additional directions are also indicated, which divide the angle by an even smaller number of degrees and sets this value to 27.5. This rose is used in nautical navigation and shows directions such as "west-north-west", which corresponds to the concept of "west-north-west".
- 360-Beam - Generated automatically by electronic equipment and accurately indicates the direction to each degree of the side.

The introduction of intermediate and additional sides made it possible to more accurately determine the direction of the wind or the direction of the path and, accordingly, set the coordinates.
Application of "wind rose" with intermediate sides
The construction of a "wind rose" is necessary for the arrangement of runways of air hubs, in the construction of residential areas in relation to industrial zones (calculation of the likelihood of the demolition of harmful emissions from the pipes of enterprises by air masses), highways.

They are also used in geophysics and construction climatology.
"FSES textbooks" - Federal component of the state standard of general education (2004). Federal State Educational Standard for Basic General Education (2010). Educational system "School 2100". The differences relate primarily to the basic curricula. Biology. Textbooks for the Federal State Educational Standard.
"Implementation of the Federal State Educational Standard" - 300 + 837 \u003d 1237 e-books. Special conditions for the design of students' independent work in the transition to credit units. Wide involvement of representatives of Russian and foreign companies, government organizations in the educational process. Public and professional accreditation is a new approach to assessing the quality of education.
"Work on the FSES" - "Extracurricular activities as an innovative component of the FSES of a new generation." Theoretical basis. Skills are universal educational modes of action. Assessment object. “An active teaching method. The structure of the verification work. Personal, metasubject (regulatory, cognitive, communicative), subject.
"FGOS of a new generation" - 634050, Tomsk, Belentsa street, 11 51-80-62, 51-36-12 http://tomintech.ru. Thanks for attention! Deputy Director for UMR E.A. Terentyeva. Planning and organization of work on the transition to a new generation FSES (main results). The main results of the work. Short term for the development of basic professional educational programs; Lack of guidelines for assessing general and professional competencies of students; Lack of a unified system for the development and assessment of PM; The complexity of the process of involving employers in the development of basic professional educational programs.
"Lesson on GEF" - Fgos. V. Primary anchoring. Independent work with self-test against the standard. M.E. Larina Deputy Director for OIA, primary school teacher. A lesson of a modern type. The educational situation is built taking into account: 5. Lesson control, assessment and correction of knowledge. Federal State Educational Standard Requirements ". 3. Lesson in the complex application of knowledge.
"Implementation of the Federal State Educational Standard" - "Pedagogy". The implementation of the project will help overcome the difficulties of the implementation period of the Federal State Educational Standard. Choice of teaching materials. New technologies. Social contract. There is a design problem. Federal. The principles of building the Federal State Educational Standard. Municipal. The work of the school on the implementation of the Federal State Educational Standard. Teacher work. New teaching aids and technologies.
Anonymous
Orientation and cardinal points
For a long time, people have traveled, moved across vast territories in search of food, water, building materials. However, they often faced the problem of returning to the places where they had already been. This primarily stimulated people to learn how to navigate the terrain.
The very first guideline for finding the right direction was the sun... It was by him that people began to determine where the known to us are. north, west, southand east... The sun appeared in the east and disappeared in the west. If you stand facing east, then north will be on the left, and south on the right.
But it was not only during the day that it was necessary to determine the path. In addition, the sun could not always be found in the sky during the day. Therefore, people have learned to determine the cardinal points by to the stars... Having studied the basic laws of the movement of stars and their location in the sky, it was possible even at night to find out in which direction to move.
However, the stars could not fully satisfy human desires. In different parts of the globe, the stars looked differently. Then came to replace them compass... No, it did not look like a modern one and was a magnetized metal needle that floated on two straws in a vessel with water. Then compasses were modified for a long time and turned into what we used to call this word.
Intermediate cardinal points
After a person was able to better navigate the terrain, it became necessary to introduce the concept of intermediate sides:
- north-east direction;
- northwest direction;
- south-east direction;
- southwest direction.
As you can see, the main direction (north or south) is in the first place, and east and west are in the second.
So why were these concepts introduced? Let's say you went on a hike, and in order to come to a pre-selected place, you need to go from point A to point B. But here's the bad luck: point B is not located in the north, south, west or east. What to do? Go first north, then east, winding extra kilometers, or go straight? Of course, directly, you answer. But to go straight, you need to know the direction. Therefore, intermediate cardinal points appeared.