Didactic means - organization of the educational process - sidorov sergey vladimirovich. Classification and use of visual aids What is a visual aid definition
Educational visual aids and technical means of the educational process should be classified according to the types of educational activities in which they participate in educational activities.
Indicative actions are assisted by educational and visual information aids and technical means of information. They speed up the processing of information, increase the efficiency of perception of complex phenomena, dynamic processes, optimize orientation in the upcoming performance and control actions. Teaching teaching and visual aids and teaching technical aids help to effectively carry out performing actions, process information, exercise in acquiring and consolidating knowledge, skills, and individualize learning in accordance with the characteristics of each student. In addition, they make it possible to reduce the staff of instructors and training masters, and reduce equipment costs.
Control teaching and visual aids and control technical means speed up the verification of control results, while allowing you to partially or completely replace a highly qualified teacher with a laboratory assistant or even one of the students. They help ensure that student work is reviewed regularly and objectively.
The class of information teaching and visual aids includes the following types:
Posters are a widespread means of visually showing students complex images. They fully meet the requirements of the teacher in the conditions of classes with a small group when presenting information on processes that do not have dynamic changes.
Posters can also be made within the walls of the school (combine) by laboratory assistants or in the subject circle of students. The most time-consuming operation - transferring an image onto a large sheet of drawing paper, onto a canvas or onto the back of an oilcloth from a sketch, a drawing in a magazine, a drawing can be done using an epidiascope. When making posters, the following simple rules should be followed:
- - the height of the letters in millimeters must be at least three times the distance to the last row of tables, expressed in meters;
- - on a color poster, black on a yellow background is most clearly perceived. In descending order of brightness are green and blue on white, white on blue and green, black on white, yellow on black, white on red, white on black, red on yellow, green on red, red on green.
For long-lasting use, posters printed on plain paper should be pasted on thick paper. cardboard, and for ease of use, place them in a strict thematic order in special poster boxes, racks, rectangular or cylindrical swivel cabinets.
Static and dynamic layouts are used for the same purposes as posters. (Appendix #2)
Static layouts provide easier perception due to the three-dimensional image, especially for those students who do not have the skill of spatial imagination of planar views.
Dynamic (acting) layouts make it possible to successfully study the operation of complex mechanisms in the classroom.
Ordinary textbooks along with teacher reports are the main source of information. The organic shortcomings of textbooks include the lack of instruction and guidance on performance and control actions.
Handout informational didactic materials (tables, charts, drawings) make it possible to save class time for their image by the teacher on the board and by students in notes. Contribute to the work in the didactic system "Modern".
The class of teaching teaching aids includes the following types:
A programmed textbook, which, unlike the usual one, contains not only information, but also a guide to executive and control actions. This allows you to successfully apply it in the didactic system "Programmed learning" and in the independent work of students.
Blind distributing didactic materials that make it possible to reduce the time spent on doing exercises both in the classroom and during the student's independent work. These are, for example, incomplete diagrams, in which the student must add additional images and symbols, which is the basis of the given exercise. It can also be a drawing in which it is necessary to enter the missing parts or indicate their names, purpose.
Methodical instructions - instructions for performing practical work, drawn up in such a way as to save the teacher from trivial operations, ensure their independent implementation by students and free up time to guide the most complex actions.
The reference notes (signals) successfully used by V.F. Shatalov and his numerous followers. They are randomly used symbols representing basic information. Repeatedly operating with reference signals in the classroom and at home, the student firmly remembers and deeply understands educational information.
Control teaching and visual aids include questionnaires, which are a list of questions and tasks used in preparation for tests and exams, and tests.
In conclusion of the 1st chapter, we can say that the choice of specific models of technical means in educational processes and varieties of educational visual aids is determined by the type of educational activity for which they are intended, the objectives of training in terms of the quality of assimilation (determined by the level of assimilation), by the universality of skills and abilities (characterized by type of orienting basis of action). The choice decisively depends, of course, on the conditions in which the training is supposed to be conducted, i.e., on the adopted didactic system, and on what kind of technical means of the educational process and educational visual aids may be at the disposal of the teacher.
Having at your disposal a set of educational visual aids and technical means of information, you need to start choosing from the simplest - from the blackboard. If it is too difficult to make the desired image on it, if the students or the teacher may have a simple one, we will abandon the board, see if we can get by with a poster or transparencies. And only in the case when a static projection does not suit us, we should turn to cinema or television. The choice should go according to the principle from simple to complex, and you need to stop at the means that is necessary and, in terms of its didactic capabilities, is sufficient to achieve the goals set by the teacher. The shown path of choice helps to solve to a certain extent the problem of the shortage of technical means.
The conclusion is clear: an automated classroom should be used for programmed learning; for selective test control, the simplest methods are suitable.
In the lessons, all the basic principles of teaching are carried out in interconnection: consciousness, visibility, systematicity, strength, taking into account age-related opportunities, and an individual approach. The principle of visibility plays a special role in teaching.
The correct use of visualization in the classroom contributes to the formation of clear spatial and quantitative representations, meaningful concepts, develops logical thinking and speech, helps, based on the consideration and analysis of specific phenomena, to come to a generalization, which is then applied in practice.
The use of various visual aids activates students, excites their attention and thereby helps their development, contributes to a stronger assimilation of the material, and makes it possible to save time. The topic of the lesson and the age of the students determine both the nature of the visual aids and the features of their use. In such subjects as natural science, history, geography, visual aids are most often used to show the objects under study. In order for students to form the most correct, most complete picture of an animal or plant, of this or that event, of a natural phenomenon, etc., all this must be shown in the most natural form possible and in such a way that all the necessary details are clearly distinguishable.
Types of visual aids used in teaching: objects of the environment, demonstration visual aids, tables: cognitive, instructive, training, reference; counting devices; measuring instruments; illustrations; didactic material.
Many visual aids - tables, some models, abacus for individual use, palettes, counting material, some types of handouts, etc. - can be made by students themselves. When preparing this or that manual, students inevitably have an interest in it, there is a desire to understand its purpose and mathematical structure. And this leads to better understanding and better assimilation of educational material. In the course of work on the production of manuals, interdisciplinary connections are carried out: on the one hand, children apply their mathematical knowledge and skills (calculation, measurement, drawing). On the other hand, they rely on the skills acquired in labor lessons (paper cutting, gluing, etc.).
From the point of view of use, visual aids are divided into general class and individual.
It is useful to involve children in the production of visual aids. This is of great educational and upbringing value, contributes to the conscious and lasting mastery of knowledge and skills, and helps to develop certain labor skills. Working with manuals made by hand, the child learns to respect work.
In the learning process, visual aids are used for various purposes: to get acquainted with new material, to consolidate knowledge, skills, and to test their assimilation.
When a visual aid acts as a source of knowledge, it should especially emphasize the essential - that which is the basis for generalization, and also show its insignificant, secondary significance.
Introducing new material, you need to use a visual aid in order to concretize the reported knowledge. In this case, the visual aid acts as an illustration of verbal explanations.
According to the "methodological pyramid", the effectiveness of such an activity as "working with visual aids" is quite high - 30% of the assimilation of information. Is it possible to increase this percentage even more? - It turns out that you can, if you follow the Chinese proverb: “Tell me and I will forget. Show me and I will remember. Let me do it myself and I'll understand." You can (and should!) use standard visual aids for demonstration (various models, collections of minerals, herbariums, etc.), or you can go the other way: make original manuals yourself with the obligatory involvement of children in this work. Pioneers and schoolchildren have a good tradition: during vacations, excursions and hikes, collections of plants, insects or minerals for their school.
Such collections enrich the classrooms of the school, are a valuable visual aid that helps teachers to strengthen and deepen the knowledge of schoolchildren.
Signs of a good visual aid:
Availability of the plot;
the credibility of the content;
Sufficient format for frontal work;
The brilliance and brightness of the image;
Compliance with the content of the studied material;
Accuracy and aesthetics of self-made visual aids;
Dosage of visual aids so that the lesson is not oversaturated with them;
The time of demonstration of the visual aid (the aid should appear at the right time of the lesson and be removed after the completion of work on it).
Domestic didactics, based on the unity of the sensual and the logical, believes that visualization provides a link between the concrete and the abstract, promotes the development of abstract thinking, serves as an external support for internal actions performed by the student under the guidance of a teacher in the process of mastering knowledge.
The verbal presentation of the material allows secondary information, and visual aids help to highlight the main thing. That is why the highest quality of information assimilation is achieved with a combination of verbal presentation of the material and the use of visual aids. Visualization is used both as a means of learning new things, and for illustrating thoughts, and for developing observation, and for better memorization of material. Visual aids are used at all stages of the learning process: when the teacher explains new material, when consolidating knowledge, developing skills and abilities, when doing homework, when monitoring the assimilation of educational material.
The use of visual aids ensures the successful solution of the following didactic tasks:
development of visual-figurative thinking in students;
formation of skills for working with information presented in graphical form;
fixing attention during the assimilation of educational material;
development of cognitive interest;
activation of educational and cognitive activity of students;
concretization of the studied theoretical issues;
visual systematization and classification of the studied phenomena on diagrams, tables, etc.
Printed visual aids are an obligatory attribute of every specialized study room. Classes in informatics and information technologies are held in the informatics classroom - an educational unit of a secondary general education school, equipped with a set of educational computer equipment, appropriate educational equipment, furniture, office equipment and devices. This is a psychologically, hygienically and ergonomically comfortable environment, organized in such a way as to contribute to the maximum extent to successful teaching, mental development and the formation of an information culture of students, their acquisition of sound knowledge of computer science while fully ensuring the requirements for health and safety. Printed visual aids (posters) on informatics and information technologies are included in the List of educational and computer equipment for equipping educational institutions.
Most of the graphic materials are placed in the appendix to the thesis. Some of them, which best illustrate the essence of the tasks to be solved and the conclusions you have come to, are presented to the state attestation commission for protection in the form of separate printouts with their simultaneous display on the screen. Their list should be carefully thought out and consistent with the text of your defense speech. The number of these illustrative materials should be from 8 to 15.
As for all applications that are placed in the diploma, it is more expedient to place them directly in the course of the presentation, most often in the research part of the work.
The same materials can be presented in different ways, so don't get hung up on just one view of a table, graph or chart. Depending on what exactly you want to show visually, use a variety of types of material organization.
To make it easier for you to navigate, let's stop at a short list of the most common types of graphic materials.
1. Various types of tables (analytical, structural, combined).
2. Graphic schemes, drawings.
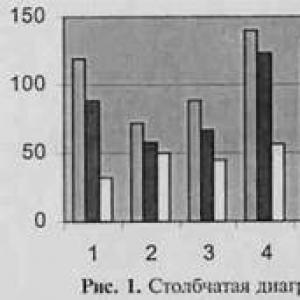
3. Charts and histograms (Fig. 1).
They visually allow you to represent the change in data over a period of time and are very convenient for visual comparison of different values. Time characteristics in histograms are arranged horizontally, and values - vertically. This highlights the nature of the changes over time.
24 5. Visual materials, their types and use

4. Area charts (Fig. 2).
They also emphasize changes over time. By displaying the sum of the values of the series, such a chart clearly shows the contribution of each series.
5. Visual materials, their types and use 25
6. Bar chart (Fig. 4).
Allows you to compare individual values. They are given more attention than temporary changes.

 |

5. Graph (Fig. 3).
Graphical dependencies allow you to visualize in dynamics the change in the facts and events of the studied phenomena

7. Stacked bar chart (Fig. 5).
This diagram allows you to evaluate the contribution of the particular to the general.
8. Pie chart (Fig. 6).
It shows the ratio of the sizes of the elements that form the data series to the sum of the elements. This type of chart is useful when you need to emphasize an important element.
To make it easier to work with small sectors in the main chart, you can combine them into one element, and then select this element in a separate chart next to the main one.
26 5. Visual materials, their types and use

9. Donut chart (Fig. 7).
Like a pie chart, a donut chart shows the relationship of parts to a whole, but it can include multiple data series (each ring in the chart corresponds to one data series).

10. Scatter plot (Fig. 8).
Clearly shows the spread of data and allows you to evaluate the stability of the studied values and results.
Thus, in the thesis it is advisable to use different types of visual and graphic materials, depending on their advantages and disadvantages and the relationship with the tasks of your work.

FORM REQUIREMENTS
6.1. General requirements
The explanatory note must be carefully read. Its total volume is determined by the leading department, depending on the requirements stipulated by the curriculum for the thesis. Applications are not included in the total volume. The explanatory note must be bound in hard cover.
The explanatory note must be neatly printed on one side of a sheet of A4 white paper (210x297). When printing, one and a half line spacing is set. Greater distance is not recommended.
The text of the note should be placed observing the following margins: left margin - 20 mm, right - 10 mm, top - 15 mm, bottom - 20 mm.
The font should be clear, medium-weight black. The density of the text should be the same everywhere. When writing an explanatory note on a computer, it is recommended to choose the font type Times New Roman. The optimal font height is 2.5 mm (12-14 p.).
Misprints, misprints and graphical inaccuracies found in the process of drawing up an explanatory note can be painted over with white paint and the corrected text is applied in black ink or paste in the same place in handwritten letters and numbers close to the main text of the explanatory note. The number of corrections on one sheet (page) should not exceed 10% of the total amount of information on the sheet.
Surnames, names of institutions, organizations, firms, product names and other proper names in the text are given in the original language. It is allowed to transliterate own names and give the names of the organization translated into the language of the
 |
28 6. Design requirements
bots (Russian) with the addition of the original name at the first mention.
In the explanatory note, abbreviations of Russian words and phrases can be used in accordance with the current state standard.
The text of the main part of the explanatory note is divided into sections, subsections, paragraphs.
Section headings are placed symmetrically to the text in capital letters. Subheadings are printed from the paragraph in lowercase letters, except for the first capital. Word hyphenation in headings is not allowed. Do not put a dot at the end of the title. If the heading consists of two sentences, they are separated by a dot. The distance between the headings of the structural parts of the work and the main text should be 3-4 intervals.
The words "abstract", "contents", "list of symbols, units and terms", "introduction", "conclusion", "bibliography" are printed on a separate line in capital letters as the headings of the corresponding structural parts of the explanatory note.
The distance between the title and the text should be one and a half times the line spacing (headings should not be underlined).
Each section should start on a new sheet (page).
Paragraphs in the text begin with an indent equal to 15-17 mm.
6.2. Pagination
The pages of the thesis should be numbered with Arabic numerals, following the continuous numbering throughout the work. The page number is put down in the middle of the top margin of the sheet without dashes and hyphens. The title page and task (see Appendix 2, 3) are included in the overall page numbering of the work, but page numbers are not put on them.
Sections, subsections, paragraphs, subparagraphs should have serial numbering within the entire work and be indicated by Arabic numerals, for example, 1, 2, 3, etc. The number of the paragraph, subparagraph includes the number of the section, subsection, separated by a dot, for example 1.1.1, 1.1.2.1, 1.3.2.4, etc. If a section or paragraph has only one subparagraph, then the paragraph (subparagraph) should not be numbered.
6. Design requirements 29
Illustrations
Illustrations (drawings, graphs, diagrams, diagrams, photographs) should be placed immediately after the text in which they are mentioned for the first time, or on the next page. All illustrations must be referenced in the text.
Drawings, graphs, diagrams, diagrams placed in the work must comply with the requirements of state standards ESKD.
Illustrations, tables, drawings, diagrams, graphs, which are located on separate pages, are included in the general page numbering. A table, figure or drawing larger than A4 is counted as one page. Sheets larger than A4 are placed at the end of the explanatory note after the conclusion in the order they are mentioned in the text.
Illustrations must have a title that is placed above the illustration. If necessary, explanatory information is placed under the illustration (the layout of information in the design of the illustration is given in Fig. 9, and an example is in Appendix 4).
Illustrations are numbered in Arabic numerals within the entire work or within one section, for example, "Figure 3.1" indicates the first figure of the third section. If there is only one illustration in the work, it should not be numbered and the word “drawing” should not be written under it.
The illustration should be on one page. If the illustration does not fit on one page, you can transfer
30 6. Design requirements
put it on other pages, while the title of the illustration is placed on the first page, explanatory data - to each page and under them indicate: "Drawing ..., sheet ...".
6.4. tables
Digital material, as a rule, should be presented in the form of a table, the conventional image of which is shown in Fig. ten.
The table should be placed in the work immediately after the text in which it is mentioned for the first time, or on the next page.
Tables are numbered sequentially with Arabic numerals throughout the entire work or section, with the exception of the tables given in the appendix. The number should be placed in the upper right corner of the table above the table heading after the word "Table" indicating the table number (an example of the table design is given in Appendix 5).
If there is only one table in the work, then it should not be numbered and the word "Table" is not written.
When transferring part of the table to another sheet (page), the word "Table" and its number are indicated once to the right above the first
| Table (number) | ||||||||||
| G 1 | ||||||||||
| (table name) | (link) | |||||||||
| Head A | ^ | Rows Subheadings Headings wow wow | ||||||||
| Lateral (column for heading) | V | / | ||||||||
| Column graphs | ||||||||||
6. Design requirements 31
part of the table; above other parts write the word "Continuation". If several tables are given, then after the word "Continuation" indicate the number of the table, for example: "Continuation of the table. 1.4",
A table with a large number of columns can be divided into parts and placed one part under the other within one page. In this case, in each table, the headings of its rows (sidebar) are repeated.
6.5. Formulas and Equations
Formulas and equations should be numbered sequentially within the entire work or section with Arabic numerals in parentheses in the extreme right position on the line where the formula is placed. For example, the notation (3.1) denotes the first formula of the third section.
If only one formula or equation is given in the work, they are not numbered.
An explanation of the meanings of symbols and numerical coefficients should be given directly below the formula in the same sequence in which they are given in the formula. The value of each symbol and numerical coefficient should be given on a new line. The first line of the explanation begins with the word "where" without a colon (an example of formulas and equations is given in Appendix 6).
Equations and formulas should be separated from the text on a separate line. There must be at least one line above and below each formula or equation. If an equation does not fit on one line, it must be wrapped after an equal sign (=) or after a plus sign (+), minus sign (-), multiplication (x), division (:), or other mathematical symbols.
References to illustrations are indicated by the serial number of the illustration, for example: "figure 1.2". When referring to the same illustration again, the abbreviation of the word “see” is added, i.e. the entry will look like this “see. figure 1.2".
32 6. Requirements for registration
If there is one illustration, one table, one formula or equation, one application in the work, then the references should be written: “in the figure”, “in the table”, “according to the formula”, “in the application”.
All illustrations, tables, formulas and equations, applications should be referenced in the text, for example: “in tab. 3.2", "according to equation 2.4", "in figure 3.5", "in Appendix 4". Repeated references to tables and illustrations should be abbreviated, as follows: "see. tab. 1.3".
References in the text to sources may be given in footnotes. On one page, the footnote should not exceed 50 mm from the bottom margin. An example of the design of subscript links is given in Appendix 7.
6.7. Enumerations and notes
Enumerations, if necessary, can be given within paragraphs or subparagraphs. Enumerations should be numbered by serial numbering in Arabic numerals with brackets, for example 1), 2), 3), etc., and printed in lowercase letters with a paragraph indent.
Within one paragraph or subparagraph, it is not recommended to provide more than one group of enumerations.
Notes should be placed if necessary to clarify the content of the text, tables, illustrations to which they refer, and are printed with a capital letter from a paragraph indent.
The word "Note" should be printed with a capital letter with a paragraph indent in a spacing and not underlined.
One note is not numbered. Several notes should be numbered by serial numbering in Arabic numerals with a dot, for example:
Note.
Notes:
1...........................
2...........................
3...........................
The note is highlighted using a smaller font size (main text - 14 p., for notes - 12 p.).
6. Design requirements 33
For a more compact design, only the names of sections and subsections can be included in the content. An example of content design is given in Appendix 8.
6.9. List of symbols
If specific terminology is adopted in the work, as well as less common abbreviations, new symbols, designations, etc., then their list should be presented as a separate list.
The list should be arranged in a column in which, in alphabetical order, the accepted abbreviation is given on the left, and its detailed transcript on the right. An example of the design of the list is given in Appendix 9.
If special terms, abbreviations, symbols, designations, etc. are repeated less than three times, the LIST OF ABBREVIATIONS is not compiled, and their decoding is given in the text at the first mention.
6.10. Making a list of main sources
and literature
The entire set of sources used in the performance of the thesis is drawn up in the form of two interconnected parts, which have the following structure:
Bibliography:
Literature;
Reference literature;
Periodicals;
Publications in foreign languages.
34 6. Design requirements
Normative legal acts;
Publication of documents;
Regulatory and methodological documents;
Catalogs, rules, instructions, specifications, etc.
Materials included in unpublished sources
nicknames are:
Archival documents;
Regulations on institutions;
Various types of instructions available and valid
only in specific departments of organizations and pre
acceptance, and so on.
Literature includes:
Monographs;
Textbooks, teaching aids;
Articles in various collections.
Examples of reference literature are encyclopedias, dictionaries, guidebooks, various reference books, etc.
Periodicals - magazines, newspapers, continuing collections and similar sources.
Publications in foreign languages include all sources printed in a language other than the language of the explanatory note.
These sources are arranged into groups depending on their characteristics. The initial breakdown is carried out on the basis of publication: published, unpublished sources.
Regulatory and methodological documents include standards, guidelines, catalogs, rules, instructions, specifications, etc. This is taken into account when determining the order in which the list of sources is built.
Within each selected group, sources are arranged in chronological order, within the established subgroup, documents are listed in alphabetical order by name, and normative
6. Design requirements 35
but-technical and methodological documents - according to state, departmental publications, etc.
First, dissertations are given, which are arranged in alphabetical order by the names of the authors of the works, then a list of unpublished reports in alphabetical order by title, and if the titles match, in chronological order of publication. The next group (archival documents) is arranged in the following order: by the name of the archive, then by the numbers of the archive fund, inventory, cases.
The final group, which includes provisions on institutions, various kinds of instructions, etc., is placed by name in alphabetical order. The rules for the bibliographic description of these sources are the same as for documents.
When compiling the list, the following structure should be observed:
Literature;
Reference literature;
Periodicals;
Foreign publications.
Within each part, sources should be arranged alphabetically by author's last name or title. Titles are taken into account if the names of the authors are not given.
An example of the design of the list of sources is given in Appendix 10.
All literature in the list is presented in accordance with the requirements for the design of the bibliographic description of the document GOST R 7.1.-2003.
The first element of the bibliographic description is the author. In the publication description:
36 6. Requirements for registration
The second element of the description is the title of the work. It is taken from the title page and written in lowercase letters, starting with the first capital.
The third element of the description is information about the place of publication, the name of the publisher and the year of publication.
Examples of the design of the bibliographic description are given in Appendix 11.
When preparing articles from various sources, indicate the name of the journal or collection where they were published, year, journal number and page.
The procedure for preparing an article is practically the same as the procedure for issuing a publication, described in the previous paragraph. Only at the beginning of the description is information about the article itself, then about the source containing it, for example, the journal in which it was published, the output of this journal (place of publication, name of the publisher, year of publication).
Examples of the design of the bibliographic description of articles from periodicals are given in Appendix 11.
When making subscript references, sources should be placed in the order they appear in the text of the explanatory note.
6. Design requirements 37
References to state standards indicate: the number of the standard, its name, the date of its introduction, the place of publication and the year of publication. In repeated references to standards, the designation of the document, its number and the year of adoption are given, for example: GOST R 6.30-2003.
6.11. Applications
Applications that are a continuation of the explanatory note are placed on its subsequent pages in the order of references to them in the text.
Each application should start from a new sheet (page) with the word “application” printed in lowercase letters in the upper right corner (the first letter is uppercase). Each application should have a meaningful title. If there is more than one application in the note, they are numbered sequentially in Arabic numerals without the "No" sign (Appendix 1, Appendix 2, etc.).
When one application is located on several sheets (pages), starting from the second sheet of its placement, “Continuation of the application” is indicated in the upper right corner of the page, and an entry is made on the last sheet of the application: “End of the application”. The entry is made in lowercase letters, starting with capital letters. If there are several applications, then indicate the number.
The addendum, which is a graphic or handout for the report, is drawn up according to the requirements for the presentation of illustrative material in the explanatory note.
The handout is bookmarked under an independent title page so that it can be conveniently viewed without turning or turning clockwise. Each sheet of handout must have a serial number that is identical to the number of the poster or slide used in the report.
An example of the design of the title page for the handout is given in Appendix 12.
An electronic copy of the explanatory note and the addendum material is stored on an external medium (floppy disk or CD). It is filed in the appropriate package at the end of the explanatory note.
38 6. Design requirements
annotation
The abstract is a brief description of the thesis and should contain:
General information about the work: volume, number of illustrations, tables, number of sources used;
List of keywords;
The annotation begins with general information about the work in the form of a list of the parameters listed above, indicating their number. They are written from the red line in lowercase letters, with the exception of the first capital. For example: "The volume of work is 92 s, 11 figures, 8 tables, 35 sources of information, 3 applications."
The list of keywords should characterize the content of the thesis and include from 5 to 15 keywords in the nominative case, printed on a line separated by commas in capital letters from a new line after general information about the work.
The abstract text should reflect:
Objective;
Methods, means of analysis and results obtained;
Efficiency or scope of the results of work.
The optimal length of the abstract text is 1200-1500 characters (no more than one page). An example of annotation design is given in Appendix 13.
The annotation is placed after the task for the thesis, is not numbered and is not included in the total calculation of the amount of work.
PROTECTION OF THE DIPLOMA
So, your thesis is written, framed, approved by the supervisor, approved by the head of the department and you have received a review.
Your defense day has been set.
The purpose of defending a thesis is to identify the degree of disclosure by the author of the topic of the work, the independence and depth of the study of problems, the validity of conclusions and proposals.
On the defense, you must show not only knowledge of the topic, but also the degree of mastery of the scientific method of thinking, the logical and statistical analysis of the problems under study, the ability for independent scientific work, the ability to clearly and clearly express your thoughts and conclusions.
You need to properly prepare for the protection procedure itself. First of all, remember that writing a thesis and defending it are two different things. The ability to briefly and accurately formulate the main provisions of the work, to characterize the specifics of the tasks being solved, the significance of the conclusions drawn are all necessary conditions for a successful defense. Nobody will do this for you. Even a very good graduation project can be “lost” if the author speaks inconsistently, quietly, inconsistently. On the contrary, it often happens that a work of average writing level is represented by a clear, logically structured presentation, detailed and capacious characteristics of the main conclusions, and most importantly, the author emphasizes in every possible way the main value and significance of the work he has done.
Unlike a test or an exam, where a teacher can help a well-performing but confused student with leading questions, orient him in the material, this will not be the case at the thesis defense. Questions will be asked based on the content of the visual materials prepared by you and what you will tell in your speech. The purpose of these questions is to clarify the main characteristics of the presented
40 7. Diploma defense
work. Unlike the exam, the commission does not know the details, the qualitative features of your work and will judge this by what it hears from you.
Therefore, your main task is to prepare an oral presentation in such a way as to highlight the essence of what you have done as advantageously as possible. Of course, many of the members of the state attestation commission will look at the text of the graduation project itself, perhaps they will dwell more closely on the aspects that interest them, but still, no one will present your work in such detail and detail as you yourself. By the way, those students who, to a greater or lesser extent, use outside help in writing their papers, as a rule, are not able to answer most of the questions asked by members of the commission. This is not to say that these questions are too difficult, but for those who have not written the work themselves, they will certainly seem difficult. I would like to say the same thing to very absent-minded students who quickly forget the material: a good knowledge of the content of the thesis at the defense is mandatory.
For a few days, carefully and slowly re-read the diploma, try to formulate a few sentences on the content of each of the chapters. Sample questions that you ask yourself as you look through the table of contents, introduction, and conclusion also help a lot. Do not be too lazy to do this, and you will feel much more confident on defense. If on the eve of the defense on the move, without hesitation, you can ask ten questions about the content of your diploma, and, after thinking a little, the same number more - well done! Be sure to write down these questions. The ability to look at your work through the eyes of an outside observer is an important step in preparing for a defense.
Of course, the text of the speech must be prepared in advance and shown to the supervisor. It is preferable that you present the report freely without reading the written text. Your speech should be clear, grammatically accurate, confident, which will make it understandable and persuasive. A graduate student who cannot tear himself away from what he has written and at least for 7-10 minutes talk about the features of his work raises great doubts. Of course, no one will take away a draft report from you if you still read it, but believe me, it will look much worse.
7. Thesis defense 41
During the presentation, pre-prepared illustrations should be used, but they should be referred to only when necessary. Sometimes another extreme is allowed, when the report contains tables, graphs, etc., but the student does not refer to them. Don't stand in one place! Take a pointer, go to the screen (of course, without a draft in your hands), show what kind of tables and diagrams they are, why they are, what is the most important thing here, what you need to pay attention to. Be sure to enliven your speech with appeals directly to the commission: “Pay attention ...”; "Dear members of the commission, as we see in this diagram..."; "This material is presented in order to..." etc.
A very good impression is made by a student who shows the relationship between the proposed visual materials.
As for the text of the speech itself, it will naturally reflect the content of your thesis. The general rules for constructing a defense speech are as follows:
1. Start by addressing the committee: "Dear committee, let me present my thesis...". If you are the first to speak or have not seen everyone who will listen to you that day, it is more logical to say hello first.
2. Name the topic of the diploma. Explain the relevance of the topic, show the connection of work with the solution of practical management problems. Otherwise, it will not be clear what the value of your work is. The words "relevance" and "practical tasks" (naturally, with a specific list of them) should sound mandatory in the speech.
3. Tell us what was the purpose of the thesis and what tasks did you solve for this. In fact, tasks are different directions, i.e. aspects of your thesis. Name the subject of study and the object of study.
4. Highlight the material on the basis of which the work was written. What are these sources, where did you get acquainted with them, what are the features of working with them.
5. Move on to working methods. Briefly list them (you can do this in conjunction with sources). For example: “In our work, we used internal documentation related to the work of departments ..., when analyzing these sources, we used the method of comparative characteristics or express analysis of financial documentation ... etc.”
42 7. Diploma defense
6. The main conclusions of the thesis. Here it is necessary to turn to visual materials (although some of the diagrams can be presented earlier and relate to the formulation of problems, the relationship of sources, etc.).
7. Summarize: remind about the relevance of the work, explain the specifics of the tasks being solved and clearly articulate what is the value of the work you have done.
After that, thank the members of the commission for their attention and wait for questions.
During the presentation, attention should be paid to the correct pronunciation of words. There are about two or three dozen words in the language of economists, which are almost always pronounced with an error in stress. For example, the following words and phrases should be pronounced correctly: August, agency operations, gross, irrevocable letter of credit, bordereau, the question was withdrawn, money, deposit, agreement (plural agreements), loan (and not a loan, but in the genitive case - a loan), discounted costs, operating asymmetry, mortgage, cambio, signature card, casco, quarter, revolving loan, marketing, miserable, start, arrears, rationing, nouveau riche, collateral, on-call credit, simultaneously, wholesale, wholesale, withdrawal of shares, industries, technical passports (passports), penalty interest, bill of exchange, time wages, accept, warehouses (warehouses), funds, transfer, statutory fund, facsimile, phenomenon, petition, contract price, wholesale price, expert, etc. 1
When making a presentation, one should strive for expressiveness, which depends on the pace, volume and intonation of speech. If you speak in a hurry, swallowing the endings of words or very quietly and indistinctly, then the quality of your speech will greatly decrease. The calm, unhurried manner of presentation always impresses the members of the commission. During the report, you must face the commission. If you need to turn sideways to the commission, you need to increase the volume of your voice.
After the end of the report, members of the commission can ask you questions, clarify certain points of the report and the results of the work. Questions can be specific or general. The most common general questions are: “What do you-
1 Consolidated dictionary of modern Russian vocabulary: In 2 volumes / USSR Academy of Sciences. In-t rus. lang. / Ed. R. P. Rogozhnikova. M.: Rus. yaz., 1991.
7. Thesis defense 43
full of you personally? What is the novelty of the work?”, “What is the practical significance of the work?”, “How does your proposed solution differ from the existing ones?”.
After the announcement of the question, do not rush to immediately give an answer. As you should comprehend the question, concentrate. If you don't understand a question, ask them to repeat or clarify the question.
Answers should be specific, short and usually consist of two or three sentences. The tendency to doubt when answering can be perceived by the members of the commission as the uncertainty of the graduate student in knowledge and poor understanding of the issues covered in the work, therefore, the shortest of all possible answers should be given. You should answer confidently, clearly, if necessary, refer to the slides and the text of the thesis.
Visualization contributes to the education of the child's sense of reality. Visual aids are used most often when the object of study is inaccessible to the direct perception of students either geographically, or due to the degree of its structural complexity, or for any other reason. By facilitating the implementation of visibility, teaching aids provide a wealth of perceptions. But it must be borne in mind that a visual teaching aid is much poorer than a natural object.
Concretizing the educational material, the textbook does not provide the fullness of life relationships that we discover and reveal to students, for example, on excursions.
A visual aid leads to mediated cognition. It encourages not only to perceive reality, but also to comprehend it, that is, to reflect it most fully, adequately to reality. This is the essence of the educational role of visual aids.
Using a visual teaching aid, we first of all give students the opportunity to perceive it as a whole, and then, through analysis, reveal its main parts and their relationships, and then again come to a synthesized perception of the whole. Thus, here the child passes from a synthesis in thoughts to a synthesis in things. And then he transfers what he learned at school into everyday practice and thus checks the derived provisions, fixing them even more firmly in memory.
A visual teaching aid makes it possible to concretize the educational material. In some cases, the object being studied is simple in itself, accessible to direct perception - we bring it to the classroom, show students, for example, branches, flowers; or we make an excursion, for example, to a barnyard, to a park, in other cases, it is inaccessible to direct perception, and then we have to use a picture, a stuffed animal or a model. Sometimes the object being studied, although accessible, is structurally very complex for the perception of the child and, as such, cannot be presented for direct study in the lesson, for example, a steam locomotive. In such cases, not a natural object is taken in all its complexity, but a simplified model of this object, thanks to which students are able to understand what is needed. Afterwards, it is useful, on occasion, to show the natural object itself. The manual often makes it possible to replace complex relationships with simple ones. We show the class a diagram. Here, relations of large numbers, relations that are difficult to represent, are replaced by relations of small numbers, relations that are simpler and more visual. This means that both the model and the diagram simplify the material, make it accessible to the child, and enable students to comprehend and understand it.
The textbook can also be considered as a mnemonic device, which makes it possible to better preserve the material in the memory of students. And here the student remembers not only the manual itself, but also what was connected with the manual, at least only in time.
A visual teaching aid arouses interest and thereby refreshes the attention of students and, in addition, gives this attention a certain direction.
The manual makes it possible to sum up the results of the work done in a particularly simple and visual way. For example, a student is given separate details of a stool, representing the various stages of its manufacture, and it is proposed to arrange them in the sequence of technical processes for the manufacture of this thing. Or in a science lesson - select from the album drawings of animals of one species or another, class.
It is possible to outline a number of requirements that visual teaching aids must satisfy. The benefit must be demonstrative, i.e. in it those aspects of it that are to be studied should be clearly evident.
For example, a counting ladder consists of 10 sticks of various lengths: here the length of the sticks is what catches the child's attention. These sticks make a ladder only if they are selected according to their successively decreasing length.
If there are 10 cylinders of the same length and color, but differing in base diameter (from 1 to 10), then the students' attention involuntarily stops at this difference - this is thick, and this is thin; this one is even thinner, etc.
The manual should give children something new, even if it is an object familiar to children. For example, the picture shows a squirrel, an object familiar to 7th grade students in a special school. But it is possible that the students do not know how the squirrel dries his mushrooms. Here in the picture of the benefits, mushrooms planted on tree branches are visible.
Each allowance must be affordable for the age group for which it is intended. For example, you need to teach children to decompose the numbers of the first ten into 2-3 terms. To do this, you can make a plate where a certain number of buttons is drawn. The board is posted on the board. And students have rulers and boxes with buttons. The rulers are so narrow that they are 2-3 mm smaller than the diameter of the buttons. It is required to take from the box the number of buttons that is drawn on the plate (the difference between the number and the structure), and decompose them into 2 or 3 rulers.
The manual should act on the student by the variety of its qualities: both in color, and in size, and in the thoroughness of decoration. It should make an aesthetic impression. This requirement is important to observe in homemade manuals.
Of particular importance are those benefits that can be used in different sections of the course.
For example, the same counting ladder can be used to check how students compare lengths:
Give the longest (meter);
Give the largest of the remaining (9 decimeters);
Give the largest of the remaining (8 decimeters), etc.
It can also be taken when passing through the composition of the numbers of the first ten, when you add a stick of 3 dm and 2 dm and replace them with a stick of 5 dm; when passing the count within two tens, it is again possible to use the counting ladder; take a stick of 10 dm. Read: one in ten or eleven. Put 2 dm and get two for ten - twelve, etc.
If we have a number of manuals on any issue of the course, then they should be arranged in a class in such a way that the arrangement itself prompts students to certain conclusions and generalizations. For example, there are three posters:
"In the proposal before a a comma is placed";
"In the proposal before but a comma is placed";
"In the proposal before what a comma is placed."
With a successful arrangement of posters (one below the other), students easily make a single wording: “In the sentence before ah, but what a comma is placed."
Visual aids are purchased in special stores of visual aids. A lot of benefits can be chosen in children's toy stores. Benefits can be made at labor lessons in various school workshops. And, finally, manuals can be made by the teacher himself or by the student under the guidance of the teacher in the process of out-of-class jams.
Visual aids by themselves do not play any special role in the learning process, they are effective only in combination with the word of the teacher. Very often, the principle of visualization is perceived by teachers as the need for students to directly observe certain phenomena. However, not every perception is and is not always productive, it can be such only with active thinking, when questions arise and students strive to find answers to them. Even N. Pirogov once noted that “neither visibility, nor the word itself, without the ability to handle them properly ... will not do anything worthwhile.”
In the practice of teaching, the use of visual aids is combined with the word of the teacher. The ways of combining words and means of visualization, with all their diversity, make up several basic forms. One of them is characterized by the fact that, through the medium of the word, the teacher directs the observation conducted by the students, and the knowledge about the external appearance of the object, about its structure, about the ongoing processes, the students receive from the observed objects.
There are different ways of combining words and visualization, which are analyzed and summarized in detail by L.V. Zankov in his book “Visibility and activation of students in learning” (M.: Uchpedgiz, 1960). The most typical of them are:
With the help of a word, the teacher reports information about objects and phenomena, and then, demonstrating the appropriate visual aids, confirms the veracity of his information;
With the help of the word, the teacher directs the students' observations, and they acquire knowledge about the relevant phenomena in the process of direct observation of this phenomenon.
Obviously, the second method is more effective than the first, since it focuses on the activation of students, but the first is most often used. This is explained by the fact that the first method is more economical in time, it is easier for the teacher and requires less time to prepare for classes.
On the one hand, visualization can be used to enrich the sensory experience of students. In these cases, it should be as bright and colorful as possible, for example, when studying history, literature, etc.
On the other hand, visualization can only be used to clarify the essence of the phenomenon. In this case, in a lesson on the same topic (sulfuric acid), the teacher himself talks about its physical properties and shows these properties.
The first of the mentioned forms of combination is more effective not only for the assimilation of knowledge, but also for the development of students' observation skills. The superiority of the first form is especially pronounced when a subtle analysis of the object must be carried out, for example, when studying the internal structure of a leaf. Since the use of another form of combination requires less time, one can resort to it when a relatively "rough" analysis of objects is performed.
The teacher's knowledge of the forms of combining words and visual aids, their variants and comparative effectiveness makes it possible to creatively use visual aids in accordance with the set didactic task, the characteristics of the educational material and other specific conditions.
Each visual aid has a number of didactic features that determine the rational area of use in the educational process. For example, such a property of natural samples as their reality contributes to the formation of a correct idea in students about the shape, color and size of the object. The use of this type of visualization makes it possible to move from the observation of specific samples to abstract thinking. In the teaching of general technical and special subjects, showing real objects is often the only way to convey information about them to students.
The teacher presents visual aids in class in various ways. Among them, the following are most often used: demonstration of natural and artificial objects; sketches on the board; hanging posters; the use of technical teaching aids; presentation of information on graphic displays. The teacher needs to know the advantages of each of them in the educational process. For example, showing transparencies takes less time to present the material than it takes to present the same information with the help of sketches on a blackboard with chalk. The method of displaying transparencies is more flexible than the demonstration of a filmstrip, since it allows the engineer-teacher to give material in any order, and, if necessary, quickly return to previous frames.
The effectiveness of the selected visual aid is largely determined by the methodology and technique of its use in the classroom. Everything is important and significant here: the location and illumination of the visual aid in the classroom, its visibility from all points of the classroom, the teacher’s skillful combination of words and demonstrations, the time of the demonstration, the degree of students’ preparedness for the perception of visual aids, the teacher’s pedagogical qualifications.
Questions of methodology for the use of visual aids
1. When preparing for the lesson:
1.1. definition of didactic tasks solved with the help of visual aids;
1.2. detailed knowledge of the visual aids intended for use in the lesson;
1.3. determining the place of visual aids in the classroom;
1.4. determining how to use visual aids in the classroom.
2. During the lesson:
2.1. preparing students for the perception of the demonstration of the manual. Creation of a problem situation;
2.2. management of the perception of the manual (side-by-side explanations, highlighting the main thing, commenting, etc.);
2.3. analysis, together with students, of educational material obtained with the help of visual aids;
2.4. guidance of independent work of students in understanding the materials obtained with the help of visual aids;
2.5. a rational combination of various forms and methods of communication of educational material and educational work of students, taking into account the content and specifics of visual aids.
Didactic tasks solved using visual aids
communication to students of more complete and accurate educational information, resulting in an increase in the quality of education;
increasing the accessibility of education;
increasing the pace of presentation of educational material;
increase of interest, satisfaction of their requests and curiosity;
reducing the fatigue of students in the classroom;
Switching the saved time to creative activities;
increase in the share of time for independent work of students;
Facilitate the work of the teacher and students.
Learning situations requiring the use of visual aids:
· The studied objects in nature are very large or just as small;
The need for a visual expression of the relationship of elements, showing the principle of operation of the device;
Demonstration of the mutual arrangement of the parts of a mechanism or machine in the most characteristic moments of movement.
Methodological requirements for the demonstration of visual aids
· A visual aid should be demonstrated when it became necessary in time and according to the content of the studied material;
Do not overload the lesson with a demonstration of visual aids;
· In the process of perception of the demonstrated visual aid, it is necessary to involve as many sense organs as possible - sight, hearing, touch, etc.;
Rationally combine the word and demonstration. The word precedes, accompanies and concludes the demonstration of visual aids;
Encourage students to show initiative, mental activity and independence when studying visual aids;
· Skillfully use the “novelty effect” - do not show visual aids to students until the moment of its demonstration;
· Active and dynamic visual aids must be shown in dynamics, in action;
· Provide conditions for good visibility of the demonstrated visual aid (location, illumination, image clarity).
The method of using the visualization of the teacher of the discipline "Technology of hairdressing works" has to use various types of visualization: natural and pictorial, volumetric and sound, symbolic and graphic. The teaching of technology is closely related to the observance of the two most important didactic rules associated with the principle of visibility (according to Ch. Kupisevich). Direct study of reality, that is, study based on observation and various practical activities, should be the starting point of educational work with students in those cases when they do not yet have such a supply of observations and ideas that are necessary for understanding the topic being studied in the lesson. In order for the student to be able to acquire correct, solid and operational knowledge through the direct study of certain objects, phenomena and processes, his cognitive activity should be skillfully managed.
The use of visual aids for teaching technology seems to be an indispensable condition for the effectiveness of the educational process, since they include all the subjects and tools of activity that teachers and students use to more effectively implement the tasks of education. Each lesson requires a sample (similar samples), diagrams, sketches, instruction cards.
Incomplete information necessary for each specific work of materials, tools, devices eliminates an unproductive approach when all data is known, but stimulates the search for what is necessary, which solves the problem of forming self-control skills in students. The graphic representation of samples (instruction cards) can be used both at the stage of task analysis and in independent practical activities of children as informational support. Sometimes, if the image is "transparent" enough, it can replace a sample for task analysis, which contributes to the development of spatial and figurative thinking.
When teaching technology, the use of visual teaching aids is especially important. The teacher is insured against many methodological errors if the students are faced with a visually perceived object. Then the explanation, the terms used in this case, do not conflict with a complex image, as often happens if they try to verbally convey an object that is inaccessible to observation.
Summarizing the above, we note that:
1. Visibility is not some property or quality of real objects, objects or phenomena. Visualization is a property, a feature of the mental images of these objects. And when they talk about the visibility of certain objects, they actually mean the visibility of the images of these objects.
2. Visibility is an indicator of the simplicity and comprehensibility for a given person of the mental image that he creates as a result of the processes of perception, memory, thinking and imagination. Therefore, the image of a real-life object or phenomenon can be illusory, and, conversely, the image of an object or phenomenon that does not really exist, a fantastic object, can be quite visual.
3. The visibility or non-visibility of the image that arises in a person depends mainly on the characteristics of the latter, on the level of development of his cognitive abilities, on his interests and inclinations, and finally, on the need and desire to see, hear, feel this object, create a bright , a clear image of this object.
3. It should be borne in mind that the functions of teaching aids and visual aids in training can be completely different. In some cases, visual aids can be used to create in students specific, visual representations of the objects being studied, phenomena or events that they have not observed. In other cases, visual aids are used so that students can do certain actions with them. Benefits can also be used as materialized supports for the assimilation of complex abstract concepts. Etc.
Each time, using certain visual aids and visual aids, the teacher is aware of exactly what function these aids should perform in the educational process, what role they should play in solving educational problems. You can not use visual aids just to saturate the lessons with visibility.
4. When using visual aids and visual aids, the teacher must take into account both the age and individual characteristics of students, the characteristics of the content of the educational material, as well as their personal qualities: after all, one teacher speaks better, the other is more inventive, etc.